![]()
![]()
![]()
![]()
![]()
![]()
![]()
![]()
![]()
![]()
![]()
![]()
![]()
![]()
【現在の私】
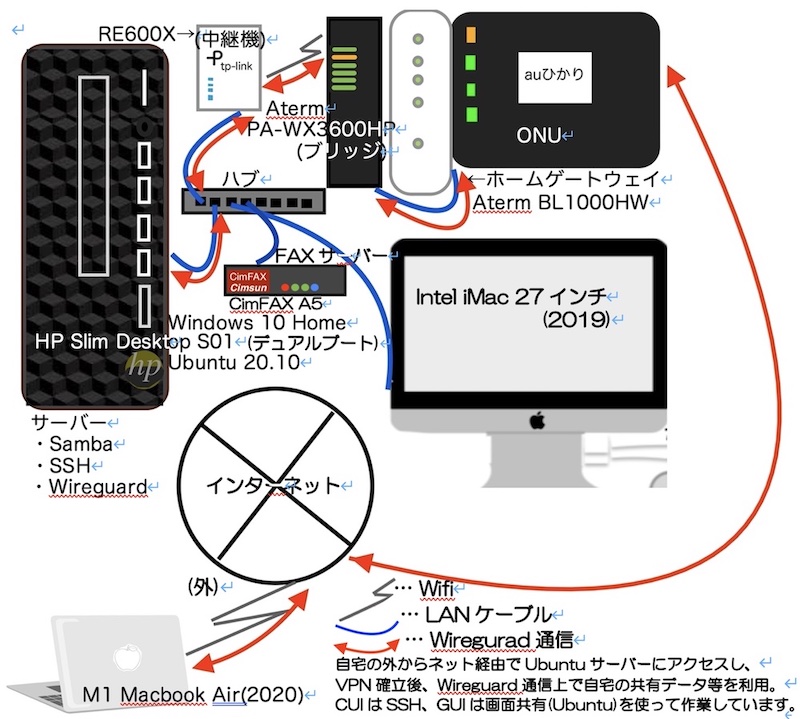
2021年12月、自宅からアパートに引っ越して、ガラリとネット環境が変わりました。
光回線はソフトバンク光からauひかりへ、VPNなどを利用していたAsusルーターを廃棄し、アパートで新たにUbuntuでWireguradサーバーを構築し、外から作業時、Wireguard通信上でやり取りしています。(SSH、Sambaやリモートデスクトップなど)。
(※)画像をクリックするとより大きい画像が出ます。
仕事やら何やらで忙しく、ホームページ更新がなかなかできず、悪しからずご了承下さい。。![]() | Windows
| Linux
| macOS
| iPhone&iPad
| Android
|
| Windows
| Linux
| macOS
| iPhone&iPad
| Android
|
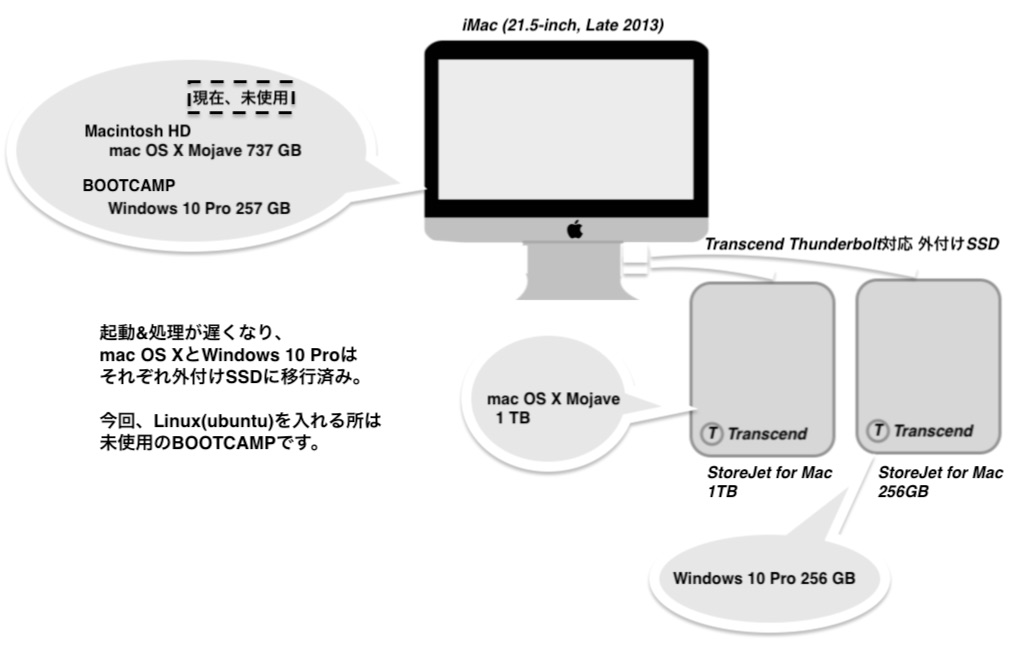
![]() iMac (21.5-inch, Late 2013)にてデュアルブートしていた、mac OS XとMicrosoft Windows 10 Proをそれぞれ外付けSSD、Transcend StoreJet for Mac 1TBとTranscend StoreJet for Mac 256GBに移行しました(Windows 10 Professional 導入:外付けSSD参照)。
iMac (21.5-inch, Late 2013)にてデュアルブートしていた、mac OS XとMicrosoft Windows 10 Proをそれぞれ外付けSSD、Transcend StoreJet for Mac 1TBとTranscend StoreJet for Mac 256GBに移行しました(Windows 10 Professional 導入:外付けSSD参照)。
全部外付けSSDに移行して、Mac本体は全く使わないのは勿体ないので、ライセンスの関係からWindows 10が使えないBOOTCAMPを削除して、そこにLinuxを入れる事にしました。
(※)画像をクリックするとより大きい画像が出ます。
Linuxと言えど、ディストリビューションはご存知の通り様々ありますが、ネットなどで調査して、初心者でもインストールしやすいよう、手順を細かく、易しく、丁寧に書かれたホームページ How to install Linux on a Macintosh and dual boot with macOSが決め手となり、日経Linuxなどでよく取り上げているUbuntuをインストールしようと決めました。
↑のHPを見て、ポイントは下記ですね。
This tutorial has been tested on a late 2013 Macbook Pro Retina 15″, however it should work with any EFI based Mac (more on that in a bit). The EFI based Macintosh started around 2008 (you can check the list of the Apple EFI systems here). This should include Macbook Pros, Macbook Air, iMac and probably Mac Pro’s…
Update: Apple’s new P2 ‘Secure boot’ chip
Unfortunately, from 2018, Apple decided to add a new ‘secure boot’ T2 chip into their mac hardware. This basically means that you can’t use anything other than macOS on Apple hardware, however it is possible to switch off secure boot. See the image to the right to show you how to find out if your machine has the T2 chip.
I used MacOS Mojave, which is the latest version of macOS at the time of writing. Recently Apple introduced a ‘security feature’ called ‘SIP’ (System Integrity Protection) which you will additionally have to overcome if you are using El Capitan or newer. More on that in a bit. We will be installing Ubuntu. This tutorial was written with Ubuntu , but this should apply to any Linux distro more or less, although your mileage may vary with Video stuff particularly.
後はUSB メモリから直接ブートできる Linux のインストールメディア作成に必要なハードとソフトを用意とインストール時、間違ってMac領域削除の可能性もあるので、バックアップです。
![]() |
|![]()
![]()